Background
In a previous post I discussed the Adafruit CC3000 WiFi shield and how I got the hardware and libraries installed. In this post I'm going to show you how I got my WiFi Arduino talking to a simple PHP script.
First, I think it's helpful to visualize exactly what's going on in these sorts of interactions. The handy diagram below is a rough sketch of what's talking to what (it's actually much more complicated, but the code I wrote pertains to these actors):
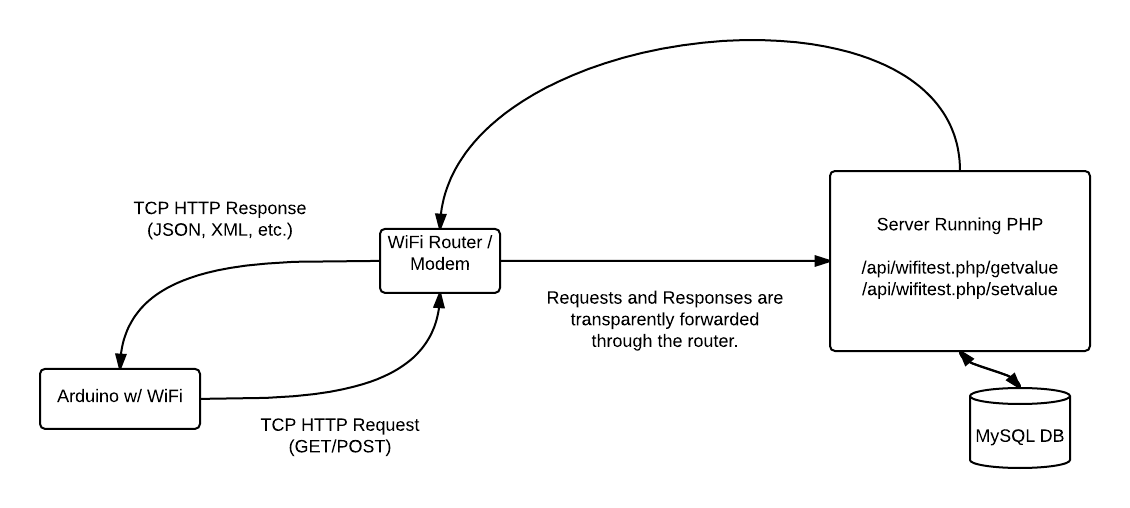
The Arduino first connects to the WiFi access point through the CC3000, piping the credentials and configuration options through one of several pins on the Arduino to the CC3000 hardware. The CC3000 handles the logistics of sending and revieving messages from the router, returning the results to the Arduino.
Then, through the magic of TCP, these messages that are sent from the Arduino are recieved and interpreted by my server running PHP. For this exercise, I used the Slim PHP Framework to create two URL Routes (more on that later) that the arduino can send requests to -- one that allows it to set a value and one that simply responds with the current value. These values are collected and stored in a MySQL database that is queried by PHP.
Once the initial request is interpreted by the PHP script, a response is generated and sent back via TCP to the Arduino for it to interpret.
As I hope you can see, this sort of interaction is highly extensible and can be leveraged to preform all sorts of duties. For example, you could report values to a server and have the server catch them and store them in a database or periodically check for messages and display any that it recieves. Also, with a WiFi shield the communication is totally wireless!
The Arduino Code
Now it's time for the code, however it does require a little explanation. I used an command line application called "bii" to do this project. It's a dependancy manager that keeps all your libraries in one place and fetches them from the internet if they're not there locally. At compile time, bii reads your main C++ file, collects all of the includes, and links them. It's very handy at the expense of having random includes in your file. It is also capable of compiling your Arduino source files and uploading them to your board, a definite plus.
I did this because doing advanced interactions via HTTP on the Arduino is actually really hard and requires a lot of string manipulation. HTTP responses in this context are all plain text streams and the CC3000 library doesn't have any capability to parse out any information in the responses it recieves. The Bii repository had a nice library created by a guy named "Lasote" that did just that, so I decided to roll with it.
Here's an example HTTP Response so you have an idea of what you need to parse through and why this client interface is necessary:
Date: Thu, 01 Jan 2015 21:27:23 GMT
Server: Apache/2.4.7 (Ubuntu)
X-Powered-By: PHP/5.5.9-1ubuntu4.5
Vary: Accept-Encoding
Content-Encoding: gzip
Content-Length: 87
Keep-Alive: timeout=5, max=100
Connection: Keep-Alive
Content-Type: text/html
{"id":"4","value":"99","reason":"To test if the arduino can decode json"}
Being able to print out ret_code and the raw response body in response_buffer (both variables populated by this interface) as opposed to having to parse through the entire string above is pretty handy.
Now, without further ado, here's my C++ code for the arduino:
// Arduino symbols and Bindings
#include "Arduino.h"
#include "ntruchsess/arduino_uip/uipethernet.h"
// client interface for HTTP communication
#include "lasote/arduino_http/http_client.h"

// a processor to decode JSON
#include "lasote/stream_processor/stream_json_processor.h"
#include "lasote/stream_recorder/stream_recorder.h"

//For cc3000 adapter
#include
#include "diego/ardunet/cc3000client.h"
#include "diego/ardunet/cc3000utils.h"

#define WLAN_SSID       "Atlantis"        // cannot be longer than 32 characters!
//#define WLAN_PASS       "xxxxxxxx"
char WLAN_PASS[] = {0x69, 0x69, 0x69, 0x69, 0x69, 0x00};
// Security can be WLAN_SEC_UNSEC, WLAN_SEC_WEP, WLAN_SEC_WPA or WLAN_SEC_WPA2
#define WLAN_SECURITY   WLAN_SEC_WEP

// These are the interrupt and control pins
#define ADAFRUIT_CC3000_IRQ   3  // MUST be an interrupt pin!
// These can be any two pins
#define ADAFRUIT_CC3000_VBAT  5
#define ADAFRUIT_CC3000_CS    10


using namespace lasote;

//create CC3000 instance, and an SDK compatible Client
Adafruit_CC3000 cc3000 = Adafruit_CC3000(ADAFRUIT_CC3000_CS,
        ADAFRUIT_CC3000_IRQ, ADAFRUIT_CC3000_VBAT, SPI_CLOCK_DIVIDER);

CC3000Client client(cc3000);

char response_buffer[150];
// This processor simply writes the response to a buffer
StreamRecorderProcessor response_recorder(response_buffer, 150);
HttpClient http_client(client, Serial);

// the keys of the values I'd like to fetch from the response
//const char* queries[] = {"id", "value", "reason"};
//                  processor(ArrayofQueries, nQueries, MaxNameSize, MaxValueSize, MaxTraceSize)
//StreamJsonProcessor processor(queries, 3, 10, 10, 10);
// the setup routine runs once when you press reset:
void setup() {
    // open the serial connection to report messages
    Serial.begin(9600);
    Serial.println("************* SETUP ****************");
    // begin the wifi connection using the cc3000 interface
    startConnection(cc3000, WLAN_SSID, WLAN_PASS, WLAN_SECURITY);

    // add a HTTP Response processor
    // this will take the response stream and process it depending on
    // which processor we use. (i.e. JSON or just a raw buffer)
    // http_client.processors.add_item(&processor);
    http_client.processors.add_item(&response_recorder);

}

// the loop routine runs over and over again forever:
void loop() {

    delay(20000);
    Serial.println("--- SENDING POST---");
    //Reset processors and custom headers
    http_client.reset();
    //We can add custom headers to the request if we wanted
    //http_client.add_custom_header("Content-Type", "application/json");

    // Send an HTTP GET request for the value
    int sent = http_client.get("condejo.org", "/api/wifitest.php/getvalue", 80);
    // Evaluate the return code from the HTTP response
    short int ret_code = http_client.receive();
    Serial.println(ret_code);
    if(sent){
        if(ret_code){
            if(ret_code == 200){
                Serial.println("Code 200 OK!");
                // for the JSON processor if we were using it
                // if(processor.finished()){
                //     Serial.print("Reading ID: ");
                //     Serial.println(processor.results[0]);
                //     Serial.print("Reading Value: ");
                //     Serial.println(processor.results[1]);
                //     Serial.print("Reason: ");
                //     Serial.println(processor.results[2]);
                // }
                // else{
                //     Serial.println("Return JSON not detected or queries not found!");
                // }
                Serial.println(response_buffer);
            }
            else{
                // PHP didn't like the request
                Serial.print("Http Error:");
                Serial.println(ret_code);
            }
        }
        else{
            // TCP Broke and we didn't get a response to our request
            Serial.println("Error receiving!");
        }
    }
    else{
        // Couldn't send the initial request in the first place
        Serial.println("ERROR CONNECTING... retrying");
    }
}
On first run, this program runs a subroutine that initializes critical objects and connects to the configures WiFi access point (in this example, it's called Atlantis).
It then enters a loop, making a request to the server once every ten seconds. I simply have the arduino report this response over Serial, however you can do much more with it. For example, the response can be programmatically used as a trigger to preform advanced functions like turning LED's on/off, sending a text message, or even sending a new HTTP request to a different server.
The PHP Code
As I already discussed above, the PHP is designed to recieve, interpret, and respond to the Arduino's HTTP requests.
For this exercise, I decided to work with Slim PHP Framework because it makes doing this sort of thing trivial, whereas with raw PHP it would be much more involved (read: more code). In this context I'm only utilizing Slim's easy-to-use URL router, however there's plenty more to be had including a templating system and a debugging interface (this last one is immensely useful).
Here's the code:
< ?php

require 'libs/Slim/Slim.php';
require_once 'dbHandler.php';

\Slim\Slim::registerAutoloader();

$app = new \Slim\Slim();

// create a route at wifitest.php/getvalue
// when someone makes an HTTP GET request here, this function will be called
$app->get('/getvalue', function() {
    // dbHandler is a piece of code I picked up along the way that encapsulates
    // often repeated SQL commands. I've modified it pretty heavily, and it's probably
    // its own post at this point.
    $db = new DbHandler();
    // grab the record with the highest ID
    $record = $db->getOneRecord("SELECT * FROM wifitest ORDER BY reading_id DESC");
    // create a new response object and populate it
    $response["id"] = $record["reading_id"];
    $response["value"] = $record["reading_value"];
    $response["reason"] = "To test if the arduino can decode json";
    // convert it to JSON and send it back to the client
    echo json_encode($response);
});

// create a route at wifitest.php/setvalue
$app->get('/setvalue', function() use ($app){
    // grab the request parameter from the Slim app object
    $value = $app->request()->params('value');
    $db = new DbHandler();
    if ($value){
        // create a new data object
        $newvalue["reading_value"] = $value;
        // insert that ish to the DB
        $result = $db->insertIntoTable($newvalue, array('reading_value'), 'wifitest');
        if ($result != NULL) {
            // let the client know the insert was a success
            $response["message"] = "Value saved!";
            $response["code"] = 1;
            echo json_encode($response);
        }
        else{
            // let the user know the insert failed
            $response["message"] = "Value not saved.";
            $response["code"] = 0;
            echo json_encode($response);
        }
    }
});

$app->run();
?>
If you've got any questions or comments about how this works, feel free to shoot me an email or Tweet! Thanks for reading.